Wednesday, February 15, 2012

Cupcakes, anyone?

So I’ve been watching increasingly large amounts of Cupcake Wars on Food Network and I am constantly in awe of what these bakers are capable of.  The first thing I want to do is go to Food Network’s website and try out some of these winning Cupcake Wars recipes.  So I do, and I’m met with this disclaimer:

“This recipe was provided by professional chefs and has been scaled down from a bulk recipe provided by a restaurant. The Food Network Kitchens chefs have not tested this recipe, in the proportions indicated, and therefore, we cannot make any representation as to the results.”

SERIOUSLY?!  Okay so first things first, you’d think that wouldn’t be a big deal right?  With any other kind of recipe, I would agree with you – all Food Network would need to do is scale down the recipe to be used for a smaller number of people.  However, if you know anything about baking or have ever watched the episode of Barefoot Contessa where she talks about baking huge amounts for the Barefoot Contessa store, you know that recipes for baking should stay the way they are.  Baking has such a specific science to it that recipes don’t double or triple well, nor do they reduce well.  Something about the reactions between the ingredients that makes baked goods so delicious turns wonky and disgusting.

Or something.

And on top of that, how in the world can Food Network justify listing recipes on their website that no one has tested?  I just think that’s nonsense, if you ask me.

Did I also mention that The Man has been watching all of these Cupcake Wars episodes with me?  And now wants me to hold my own Cupcake Wars competition in my kitchen?  Me versus myself?  Weirdo ingredient list, fancy decorations, and everything?  So what’s a pretend baker to do?  Find the best vanilla cupcake recipe in the world and the best chocolate cupcake recipe in the world and begin to use them as a base for all kinds of confectionary concoctions to try and blow The Man’s mind, of course!  So if you have a suggestion for a standard (but ridiculously delicious) vanilla or chocolate cupcake recipe that I could use as a base, I would be so appreciative!

The cupcakes I will make are so going to blow The Man’s mind.

On the menu for Sunday (The Man and my candlelit Valentine’s-ish dinner, since we didn’t really celebrate yesterday because he was working): Chicken Francese with rice and some kind of a vegetable that has yet to be determined, and Valentine’s cupcakes of one kind or another (hopefully decorated prettily so The Man won’t think I’m the worst baker ever). 

Stand by for updates on Sunday!

PS: Making knock off Olive Garden breadsticks to bring to a friend’s house for dinner Friday night – can’t remember if I’ve posted that recipe before, but if I haven’t then that will be up Saturday (and might even include some snazzy iPhone Hipstamatic pictures with my new Foodie lens… wow, I am such a dork)!

Love you to all – hope your Valentine’s Day was wonderful!

Saturday, November 26, 2011

Frozen Peppermint Cheesecake–update!

Hey all!  Okay, so I stand by my frozen peppermint cheesecake.  It was delicious and honestly, I kinda think (with some tweaks to the recipe) it would be a fantastic ice cream base.  Anyway, here’s my update on this recipe: line the spring form pan with foil.  I saw that line in the recipe, but I never do that with a regular cheesecake, so I skipped it thinking that whoever wrote the recipe was writing for dummies and didn’t realize the extra step was unnecessary.  Silly Smucker’s. (Cue menacing music.) 

Cut to me slicing into the frozen peppermint cheesecake, scooping out a piece, and realizing that absolutely every little bit of crust was stuck to the bottom of the spring form.  Yes, folks.  My cheesecake was on my plate effectively bottomless.  That’s a problem. 

So don’t make the same mistake I made!  Take the time to line your pan with foil because otherwise, you’re never getting that crust off the bottom.  And it’s just too delicious to waste that way.

Hope you all had a wonderful Thanksgiving, filled with love and joy and family!

xo

Wednesday, November 23, 2011

Frozen Peppermint Cheesecake

Thanksgiving is tomorrow and I don’t know about you guys, but I love cooking for big holidays.  Some people find it super stressful and annoying but I just don’t even think about that part.  I just pick out recipes I think look awesome and wing it.  If it works, it works.  If not, I make something different next year.  For me, these holidays are a chance to spend time with family and have a good time and if I’m stressing about food, there is no fun to be had (and that’s not okay).

So in my travels on Pinterest this past week, I found this recipe for Frozen Peppermint Cheesecake.  I looked quickly at the recipe and decided there was absolutely no way that a cheesecake recipe with only one 8 ounce brick of cream cheese could feed more than two people.  However, the idea of no-bake, frozen peppermint cheesecake was just too intriguing for me to pass up.  My 8-year-old goddaughter made a graham cracker crust all by herself – since when is she a grown up? – and I made the filling.  It took me approximately 17 seconds.  Okay, that’s an exaggeration.  But honestly, if it took me more than 5 minutes, that’s a lot.  Cream cheese, a can of sweetened condensed milk, peppermint extract, red food coloring, and whipped cream.  Done.  Folding in the whipped cream was the part that took the longest (not counting the time it took me to make the unsweetened whipped cream in the first place) and even that didn’t take long.

Oh, yes.  Unsweetened whipped cream.  Also, did I mention there’s no actual sugar in the recipe?  I was skeptical at first, as well.  However, the can of sweetened condensed milk adds all the sweetness you need.  Seriously.  Add a couple tablespoons of sugar to your graham cracker crust and call it a day.  No more.  Seriously, put down the sugar.  Walk away.  Your taste buds and your waist will thank me later.

In short, it’s delicious.  My goddaughter has an intense dislike for cheesecake and she was eagerly swiping her finger across the rubber spatula after I was done folding the batter (which she was completely able to do without fear of food borne illness because this recipe is no bake and includes no eggs!).  Awesome.  I changed the recipe up slightly and I’ll reflect those changes in the recipe below.  I know peppermint isn’t exactly a traditional Thanksgiving flavor, but the fact that this recipe is fast, easy, and delicious totally makes it worth it to me.

xo


Frozen Peppermint Cheesecake (adapted from Smuckers)

2 cups chocolate wafer cookie or sandwich cookie crumbs (I used graham crackers)
1/4 cup sugar
1/4 cup butter, melted
1 (8 oz.) package cream cheese, softened
1 (14 oz.) can Sweetened Condensed Milk
2 teaspoons peppermint extract (I used 1 1/2 teaspoons, but if you like it very minty, use the full 2 teaspoons)
2 cups heavy cream, whipped (and unsweetened!  Trust me!)
Red food coloring

In a 9” spring form pan, combine the graham cracker crumbs and sugar in a bowl. Add the butter and mix well.  Press this mixture firmly into the bottom of the spring form pan, pushing some of the mixture up the sides of the pan as well. 

In your stand mixer (or with a hand mixer), beat the cream cheese until it’s fluffy. Slowly add the entire can of sweetened condensed milk and continue beating until the mixture is smooth. Stir in the peppermint extract and food coloring. Fold in whipped cream. Pour filling into pan.

Cover the cheesecake and freeze 6 hours or until firm.

Realizations and a new look! :)

Hellooooooo Christmas blog layout! Yes, I am aware that Thanksgiving is tomorrow.  Yes, I am also aware that Christmas isn’t for another month-ish.  It’s okay.  Actually, that’s kind of the theme of this post.

I think the reason that I have a hard time posting regularly is that I like everybody else’s food blogs better than my own.  Okay, I know that’s a strange sentence, but I promise it’ll be okay.  Yes, I would rather read everyone else’s food blogs and look at their gorgeous pictures and giggle over how witty they are, and be amazed by their creativity and ability to blend flavors than sit at my computer and write up a post that may not even have any pictures attached to it at all.

So through all this thinking, I’ve come to the realization that my food blog isn’t like anyone else’s food blog (and not just because I am a slacker and don’t post regularly) and guess what?  I decided that’s okay.  I don’t own a professional-grade digital camera, I don’t take photo studio style pictures, and I am most certainly not a food stylist (though I do think that would be a pretty cool career choice).  I’m pretty technologically savvy, but I am by no means an expert (shout out to my brother who actually is an expert and helped me fix my computer VIA TEXT last night when I didn’t even know what I did to break it in the first place. How cool is he?).  Last night, I realized that’s all okay.

Here at No Frills, Just Food, I own a regular digital camera and a Blackberry whose camera has no flash.  My kitchen has one tiny window and my glass sliding door projects all the light into the wrong part of the kitchen.  The photos of my food aren’t the gorgeous shots that I envy (and drool over) from so many of the food blogs I follow – and that’s okay.  My photos will show you the actual food I cook, probably from the exact plate I will eat from while sitting at a snack table watching Sons of Anarchy on my DVR.  That’s okay, too.  (Seriously, who watched last night’s episode?! INSANE.  He’s totally dead.)

My kitchen counters are always cluttered because I choose to live my life in my house and not spend all day cleaning.  You will most likely see bits and pieces of this in any pictures I do post on this blog because that’s my real life.  And it’s okay for you to see it because it’s who I really am.  I won’t put on a front for you guys – you will always get the real me, no frills.  And yet again, that’s okay.

So if you’re okay with my messy kitchen, my less than professional pictures, and my delicious food (I promise, there’s no compromise there), then stick around because I’m going to throw some serious recipes your way.  If not, check out my blog roll for a list of the food blogs I follow that are gorgeous, spotless, and perfect – and believe me, there are plenty, and I think they are fabulous.

xo

Saturday, August 20, 2011

Simple Saturday: No Knead Pizza Dough–AKA A Food Love Letter to My Baking Addiction

Dear My Baking Addiction,

I am always on the lookout for quick and simple recipes that I can turn into a bunch of different recipes.  Your No Knead Pizza Dough is EXACTLY that kind of recipe.  It is currently rising on my stove and I can’t thank you enough – EASIEST PIZZA DOUGH EVER.  This will be dinner tomorrow night and frozen for many dinners after.

You’re the best!

Love,

No Frills, Just Food <3

No Knead Pizza Dough – lovingly reposted from My Baking Addiction

2-3/4 cups lukewarm water
1-1/2 tablespoon granulated yeast (2 packets)
1-1/2 tablespoons Kosher salt
1 tablespoon sugar
1/4 cup extra virgin olive oil
6-1/2 cups unbleached all-purpose flour

Mix the yeast, sugar, olive oil, and water together in the bowl of your stand mixer, fitted with a dough hook.  Mix the flour with the salt and add to the mixer slowly while the mixer is running until the flour is incorporated.  Transfer to a large oiled bowl, cover lightly with a kitchen towel, and allow to rise at room temperature for about 2 hours.  By this point, the dough will have risen and collapsed and gotten flat on top.  Use immediately or refrigerate for up to 12 days.  (I’m going to freeze mine and like it). 

Tuesday, August 16, 2011

Turkey Noodle Casserole–completely from scratch!

Hi everyone!  Okay, so the past couple of days I’ve been on a roll with creating some pretty awesome dinners (my family and The Man can attest to it, I promise!).  This was Sunday night’s dinner – a turkey noodle casserole with lots of fresh veggies.  I think my favorite part about this dinner is that I made it entirely from scratch.  Pretty often, I use canned “Cream of” whatever soup as the base for a lot of casserole-type dishes, but this one I made from scratch, with a little inspiration from Pinterest – if you don’t know what that is, you’re missing out!  Check out the website:

Pinterest_Logo

Anyway, I saw a recipe on Pinterest from Just Get Off Your Butt And Bake by a delightful woman named Jonna for a Chicken Broccoli Supreme Casserole.  Chicken is definitely a favorite in my house and I’m constantly trying to find ways to get The Man to eat more vegetables, so this sounded like a perfect idea to me!  So I took Jonna’s recipe (you can find the original here) and tweaked it to fit my needs and what I had available to me that day.  Here’s what it ended up looking like:

Turkey Noodle Casserole

Please excuse my blurry cell phone picture (does anyone know why Blackberry thought it was a good idea to NOT include a flash on the Blackberry Curve’s camera?  Anyone?  Yeah, me either).  I’m working on getting a camera that is more suited to taking pictures of my food, but until then, just deal – it’s DELICIOUS which totally makes up for the blurry picture.

For my Turkey Noodle Casserole, The Man and I took a spin around the produce section of my supermarket and just grabbed things: a split turkey breast that had already been cooked by the delightful staff at said supermarket and looked delicious, two ears of fresh corn, two heads of fresh broccoli, and a small bag of baby carrots.  Then, we made our way through the rest of the store and picked up egg noodles, chicken broth (no, I haven’t tried making my own yet.  I’m getting there.  I’m a little scared of it, to be honest – it’s all whole chickens and big pots and I’m just not ready),  and some sharp white cheddar.  Then we came home and it was casserole time.

I preheated the oven to 350 degrees when I got home so that when it was time for this to go in the oven, it would be ready and waiting for me and not the other way around.  Then, egg noodles went on to boil.  For the last 3 minutes of cooking the noodles, I threw in half the bag of baby carrots and let them cook together.  While that was happening, The Man (who is a sweetheart and does whatever I asked him to in the kitchen, even though he doesn’t really want to) cut the kernels off the two ears of corn, cut the florets from the broccoli, and shredded 3/4 of the split turkey breast.  Then, I completed the most difficult part of the whole ordeal (which was SO stupidly easy) – the sauce.  I used Jonna’s exact recipe for the sauce and it turned out PERFECT!  Two days later, there are no leftovers and The Man already wants me to make more.  Success?  I’d say so.

Cooking like this really is the best idea I ever had.  This whole dinner cost me approximately $10 and it fed five people, with leftovers.  Yes, I think I will do this again.

Turkey Noodle Casserole – adapted from Just Get Off Your Butt And Bake

For the sauce:

6 tablespoons butter, melted
1/4 cup cornstarch
1/2 cup cold water 
1/3 cup chicken broth
Salt & Pepper
2 cups milk (I used skim, but use whatever you have)
8 oz. sharp white cheddar cheese, grated (8 oz. is one of the normal size blocks of cheese you can find in the grocery store)

For the rest of the casserole:

3 cups of shredded turkey breast (you could definitely use cubed or shredded chicken here as well, just use whatever you have on hand)
1 to 2 cups of broccoli florets (depending on how much you like broccoli)
2 ears fresh corn, kernels cut off
1 cup baby carrots
1 lb. bag of egg noodles

Preheat the oven to 350 degrees F.  Place the egg noodles in a pot of boiling water and cook based on your package directions.  For the last three minutes of cooking, add the baby carrots.  Drain and place in a lightly greased baking dish (13x9 is what I used).  Shred the turkey and place that into the baking dish and stir together.  Cut the kernels off of the two ears of corn and stir those into the baking dish as well.  Steam the broccoli florets for 2 minutes and throw those into the baking dish as well.

Then, make the sauce.  Dissolve the cornstarch in the cold water and set aside.  Melt the butter and add the cornstarch/water mixture, chicken broth, salt and pepper, and milk.  Whisk until thickened, and then add the cheese.  Pour into the baking dish and stir gently to combine.

Top the casserole with panko bread crumbs (or normal breadcrumbs if you’d like) and a little bit more shredded cheese (I used monterey jack, but you could certainly use more sharp cheddar if you want). 

Place the casserole in the oven for 25 to 30 minutes or until the bread crumbs are golden brown and the cheese is melted.

Then, eat the entire dish over the stove because it’s just that good.  Seriously.

Signature

Monday, August 15, 2011

Sweetopia’s Kitchen Aid Mixer Giveaway

Hi everyone!  The amazing Sweetopia is having a giveaway to benefit a GREAT cause.  If you haven’t checked out Sweetopia’s incredible website, you should definitely do so here.  While you’re at it, enter to win their Raspberry Ice Stand Mixer from Kitchen Aid – the giveaway is to raise breast cancer awareness.  The proceeds from the purchase of the mixers Sweetopia is giving away went to Susan G. Komen for the Cure, a cause that I staunchly support and have for many years.
Want to hear another great part of this giveaway?  If you enter and tell them that I sent you and you win, I win a mixer too!
So what in the world are you waiting for?  Get your booty over to Sweetopia and tell them No Frills, Just Food sent you so we can win those mixers!
Love,
Sara

Saturday, August 13, 2011

One Minute Peanut Butter Cake (in the MICROWAVE!)

Yes, you read that correctly – one minute peanut butter cake that you make in the microwave.  Yes, I was confused as well, just keep reading and I promise it’ll all come full circle.

Okay, so here’s a funny story.  I’m reading through the millions of blogs that I follow on Google Reader and I come across a post by Cassie from Back To Her Roots called “Sweet Saturday: One Minute Peanut Butter Cake.”

Ummm, whaaatttt?!

So I’m immediately intrigued, right?  Because for a no frills cook, what is better than a cake you can make in ONE MINUTE?!  I keep reading and find out that this cake gets cooked in the microwave. 

Whaaaaaaaaaaaaaaatttttttttt?!?!?!?!?!?!?!?!?!

Okay, so now I’m hooked.  I have to try this.  However, while intrigued, I was also EXTREMELY skeptical.  Cakes take forever.  You have to turn on the oven to make one!  It makes the kitchen so HOT.  It’s like 86 degrees outside with 100% humidity.  There is NO way this works.

One Minute Peanut Butter Cake

Ladies and gentlemen, let me be the first to tell you: THIS WORKS.  And it’s DELICIOUS.  Check out Cassie’s post for the recipe.  Just a side note, I’m still eating this and I can’t stop.  I may have to make another one.  AND I added about a tablespoon of dried cranberries into mine as well – amazingggg.  Cassie’s post tells you to cook this in the microwave for 30 seconds, but mine took about a minute, so just use your judgment depending on the power of your microwave. 

I LOVE no frills recipes like this.  Thank you, Cassie!

Wednesday, August 3, 2011

I’m here!

Hello lovelies!  I know I’ve been away for a long time now, but I promise you the end is near.  My final semester is over on Friday and after a quick vacation with The Man this weekend, I will be back and ready to share all my delicious kitchen conquests with you!

In the meantime, just a quick list of some of the great recipes I have coming your way:

    • A series of Triscuit inspired recipes that The Man absolutely LOVES.  We are now convinced that Triscuits are the most versatile food on the planet.
    • Sweet Potato Quinoa Burgers (adapted from the amazing In Sock Monkey Slippers).  I swear these burgers tasted JUST LIKE fried rice from the Chinese restaurant. SO yum.
    • Some good old fashioned Italian comfort food, courtesy of my parents – beef meatballs and fresh tomato salad.  Literally my childhood on a plate.
    • And for when the weather starts to get a bit cooler, my Lemon Chicken Soup.  This is my absolute favorite soup recipe and literally the only one that my boyfriend can eat anymore (same goes for me, actually, now that I stop to think about it).  Canned soup just pales in comparison to this incredibly delicious bowl of comfort, adapted from Giada DeLaurentiis.
    • And last but not least, a new weekly series “Food Network Fridays,” where I’ll be highlighting one recipe from Food Network Magazine or a show on the Food Network (which I fill my DVR with every weekend).  Look for this series to start in September!

I can’t wait to be finished with my final semester and to finally be able to spend more time chronicling my foodventures in the kitchen!

Love to you all-

Sara

Tuesday, July 12, 2011

Best. Chicken. Ever.

Okay so I have a confession to make.  It might shock some of you, but it’s better to be honest with you, darling blog friends, than to keep this to myself.

I don’t like meat.

Really ever.  At all.

The only meat I eat is chicken and sometimes turkey (my mom’s beef meatballs are an obvious exception and definitely deserve their own blog post… note to self).  That’s it.  No fish, no pork, no beef (other than the aforementioned meatballs).

Needless to say, chicken can get pretty darn boring if you’re eating it basically every day like I am.  So I am ALWAYS on the look out for new ways to make chicken exciting and interesting again!

Enter Karly over at the delightful blog Buns in My Oven.  If you’ve never been to Karly’s blog, do your taste buds a favor and get your booty over there right now.  Just click the link, I promise your tummy will thank you.  She is constantly posting the most delicious looking recipes and tasty treats – she is the kind of food blogger I aspire to be!

So naturally, I’m stalking my Google Reader like it’s my job and I come across Karly’s Barbecue Dry Rub.  First of all, the photography is gorgeous – I wish my food looked half as good as hers in pictures.  Second, the recipe is DELICIOUS.  I braved the 93 degree heat today and turned on the oven (400 degrees for 20 minutes) for the six pieces of chicken that I cooked (I don’t play with the grill when The Man isn’t here, it’s just asking for fiery trouble).  Hello most delicious and simple chicken recipe ever created in the history of life!

Thank you, Karly – keep sharing your delicious recipes!


Barbecue Dry Rubbed Chicken – adapted lightly from Buns in My Oven (I changed the amounts to fit how much chicken I had and substituted chili powder for the chipotle powder)

1 tablespoon paprika
1 tablespoon light brown sugar
1 teaspoon salt
1 teaspoon pepper
2 teaspoons garlic powder
2 teaspoons onion powder
1 teaspoon chili powder
1 teaspoon dried parsley

Mix all ingredients together (I put them in a plastic container with a lid and shook it up).  Sprinkle onto chicken and rub into the meat.  Grill chicken (or bake at 400 degrees for 20-30 minutes, depending on how much chicken you’re cooking) until fully cooked. 

SO delicious.  Enjoy – huge thanks to Karly - seriously go check out her blog right now, it’s full of fantastic eats!

Tuesday, July 5, 2011

Quinoa with Onions and Spinach

Hellooo out there, blog friends!  So when I'm subbing (or working full-time in a school like I was the past 2 months - YAY for fantastic women who have babies so I can take their job for a while!), I am vigilant about bringing healthy lunches.  I make sure that I bring things that are well balanced, low to moderate in the calorie count, fresh fruits and vegetables, and all that jazz, and I drink at least 3 (regular-sized) bottles of water every day.  In addition, my classroom the past 2 months was a classroom and a bulletin board's length from the complete opposite end of the school from the main office.  Needless to say, I did A TON of running around like a crazy person from one end of the building to the other.  All of this combined probably has something to do with why I feel so much better and healthier when I'm working.

And then summer sets in.

And it's nothing but barbecue after barbecue with tons of potato and/or macaroni salad, loaded with mayo, and waiting for me to consume 1,000 calories of that alone before I even think about eating anything else.  And the anything else isn't just any old food - it's Spanish rice, sausage and peppers, BBQ chicken, pulled pork, and hamburgers and hot dogs (okay, I don't eat hamburgers, I eat veggie burgers.  And I only eat turkey hot dogs... but still), and I haven't even thought about dessert yet.  It's not okay.

So darling blog friends, listen up.  Do as I am doing and STEP AWAY FROM THE BARBECUE TABLE, because things are about to get all kinds of healthified (yes, I made that word up.  Yes, I think Webster needs to know about it).

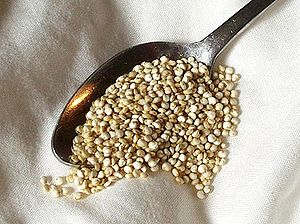
Today, I decided that after eating like a disgusting wild animal for the past few weeks, I am finally FED UP and refusing to do it anymore.  Luckily for me, my mom is the coolest human being alive and she bought me quinoa (pronounced keen-wah) a couple weeks ago and it has been sitting in my pantry since then.  For those of you who don't know what quinoa is, it's a crop that is most closely related to beets and spinach, but is grown solely for its adorable little edible seeds (seriously cute stuff, wait for the picture).  The important thing to know about quinoa is that, unlike most other grain-type foods, it is a complete protein all on its own, meaning it contains all of the essential amino acids human beings need, all in one super cute little package (which is very rare in the plant world).  It looks like this when it's uncooked:

Photo Credit: Wikipedia   

And like this when it's cooked:

Photo Credit: http://mmm-yoso.typepad.com
Super cute, right?  It tastes slightly nutty and has a pleasantly light and chewy texture.  It could easily be substituted into recipes that call for white or brown rice and I'd be just as happy eating it. 

Here's what I did today.  I chopped up half an onion and threw it into a pot with 1/2 tablespoon of olive oil (yes, I know that's only a little bit but I'm trying to be healthy here and 1 tablespoon of olive oil has 120 calories, who knew?).  I stirred that up a bit and added a sprinkle of cayenne pepper, chili powder, and paprika.  I stirred that up until the onions were nicely red from all the spices and just let it cook low and slow for a while so the onions would caramelize (caramelized onions = tons of flavor, very few calories, even less effort - seriously, I think I stirred the onions twice in like 15 minutes and they did the rest of the work on their own).  Then, I poured in 2 cups of water and 1 cup of uncooked quinoa (it's always a 2:1 ratio, liquid to quinoa, no matter how much you're cooking).  I let it come to a boil and then turned the heat down to simmer (medium-low) and let it simmer for 10 minutes with the lid on.  While that was happening, I defrosted a box of frozen spinach, squeezed out the extra liquid, and after 10 minutes I tumbled that into the pot as well.  The quinoa spent 5 more minutes simmering on the stove with a lid after that and it was done and looked like this:

So easy - and the only frills this dish has are those little curly tails that pop out of the quinoa once it's cooked.  This is definitely my kind of dish.  It tasted like yum, packed some serious nutritional value, and had very few calories (I don't know the specific count, but if you're that interested, leave a comment and I'll figure it out).  All in all, a definite success!  Next time, I would add more of the spices because the flavor didn't come out as much as I wanted it to, but it was still so yummy.  I plopped this on a plate with a veggie burger and had that for lunch and literally wasn't hungry for hours.


Make this. You won't be disappointed, I promise.


Quinoa with Onions and Spinach

1/2 of an onion, any color you'd like, chopped
1/2 tablespoon olive oil
1/2 teaspoon paprika
1/4 teaspoon chili powder
1/4 teaspoon cayenne pepper
1 box frozen spinach, thawed and squeezed to remove extra moisture
1 cup quinoa (white, red, or black would all do just fine - yes, there are even different colors! I love this stuff.)
2 cups water (you could even use chicken or vegetable stock if you wanted to add some more flavor)
Salt and pepper, to taste

Chop the onion and drop it into a pot with the olive oil.  Add the cayenne, paprika, and chili powder, and stir to combine.  Let cook on medium heat for approximately 15 minutes until the onions are slightly caramelized.  Add water and quinoa and stir.  Let the mixture come to a boil, then reduce the heat to medium-low, put on a lid, and let simmer for 10 minutes.  Defrost a box of frozen spinach, squeeze to remove excess liquid, and add to the pot.  Stir to combine and replace the lid and let cook for another 5 minutes.  Stir, salt and pepper to taste, and serve!

Enjoy! <3

Sunday, July 3, 2011

Updates #1 and 2: Cranberry Lemon Mint Granita

Hey all - just a quick update on the granita making!  I tasted the granita when it started to get a little ice crystaly (yes, it's a word) and it was still a little too sour for me, so I added another healthy squirt of light corn syrup and now everything is sweet and lovely.  Here's what it looks like three hours into the freezing and scraping process!

Hellooooo gorgeous.
It tastes as good as it looks, I promise.

Happy Independence Day! <3

Update #2:  Granita is GORGEOUS.  Check it out after 5 hours:

Yum.
Yes, I ate it.  It's DELICIOUS.  It tastes like a pink lemonade snow cone with a side of awesome.  I will absolutely make this again, and I suggest that you make it as well!

<3

Cranberry Lemon Mint Granita

Hellooooo long lost blog friends, can you hear me out there?  Well, yet again, I'm sorry for my prolonged absence, but finishing up a Master's degree and taking three more graduate classes over the summer does not leave me with a ton of time to blog about my feasts and foodasters (yes, another word smash, the man sure does love those).

Well, in celebration of tomorrow's delightful holiday - my favorite one of the whole year, in fact! - I have created the simplest, no frills, stress relieving summer dessert: my Cranberry Lemon Mint Granita.  Okay, first things first, if you don't know what a granita is, it's basically shaved ice.  Second, I know Cranberry Lemon Mint Granita sounds like quite a mouthful, but I promise you it's WAY easier than a flag cake or any other frilly dessert that's just waiting for a culinary mishap.  No thank you, I would not like to end up in the ER on the Fourth of July with third degree burns from fireworks or anything else (much less caramelized sugar that is 200 degrees hotter than the surface of the sun that I'm trying to use to make icing for a stupid flag cake).

So here's what I did.  I went in my fridge and found store brand cranberry juice cocktail and had an epiphany.  This will totally work to make one of those granitas I've been seeing millions of on food blogs and the Food Network lately!  So I poured four cups of the cranberry juice into a large measuring cup with the juice and zest of three lemons.  I unceremoniously dumped in 1/4 cup-ish of sugar and 1/4 cup of light corn syrup (more of both if you like it sweeter).  Then, I walked out into the garden, barefoot in the rain, and picked like 25 to 30 leaves of mint.  I came back, wiped off my feet, and chopped up the mint and dropped it in.  I poured the whole magenta mess into a pot and stuck it on the stove to melt the sugar (literally 2 minutes tops, it doesn't need to boil or anything).

Once that's done, I popped it into my trusty Temptations dish from QVC - seriously, a must have in my kitchen - to cool off.  (Seriously, Temptations!  It's freezer safe, oven safe, dishwasher safe, microwave safe... and GORGEOUS!  What's not to love?!)  Once it was cooled off, I had a fight with some frozen chicken and finally found a spot in the freezer for the granita (finding a place in the freezer to put this was the hardest part by far).

Here's what it looked like once it was in the freezer:


It's ready for its close-up...


Delicious.  Now, every hour or so, I'm going to open that freezer and scrape that little darling with a fork to break up the ice crystals (this will be my stress relief for the day, attacking unsuspecting ice crystals with a fork haha).  Tomorrow, it will be a fluffy mess of refreshing icy goodness.  So excited!


Cranberry Lemon Mint Granita

4 cups cranberry juice (any kind you like)
1 cup water
A handful of mint, chopped
Zest and juice of three lemons
1/4 cup sugar
1/4 cup light corn syrup

Mix all ingredients together and put in a pot on the stove to melt the sugar.  Then place in a shallow freezer safe dish and scrape once an hour with a fork.  Serve in small ice cream cups or other such simple and cute serving dishes and enjoy!


Happy Fourth of July, everyone! I'll let you know what the man thinks of this dish after tomorrow is over.  :) <3

Saturday, April 9, 2011

No Frills Apple Crumble (sans recipe!)

Hello darling blog friends!

The other night, my mom and I were hanging out and we were both craving some serious dessert.  We had plenty of ingredients in the house to use, but my eyes automatically went to the four Golden Delicious apples that were sitting in a bowl on the counter.  I can always turn those babies into something yummy - I mean, come on, they're so sweet and crisp - what's not to like?  My only issue was that I didn't have a recipe to modify to my tastes.  After hemming and hawing over whether or not to go look up some random recipe, I decided I could make one up on the spot that was just as good.  Ladies and gentlemen, it was then officially time to improvise. 

So I peeled them and cut the cheeks from the core (just like I would with a mango to avoid the pit).  I used to slice straight through the core and then cut it away from each piece of apple, but I find that takes much  more effort and as you all know, I am a minimal effort, no frills kind of girl.  I cannot be bothered with that extra step.  Peeling apples is almost too much for me as it is, I find it deeply angravating (yes friends, this is my newest favorite word smash - something the man is absolutely obsessed with doing - it's angry and aggravated slammed together into one mega-word. LOVE).

Okay, apples are peeled, cut away from the core, and diced up.  I throw them in a bowl with the juice of one lemon and toss them around.  Yes, even the no frills girl does this step - as Alton Brown would say, brown apples are not good eats, whether you're covering them with crumbly deliciousness and baking them or not.  Then, I toss in some brown sugar (I used dark the first time and light the second time, I didn't taste a difference so use what you've got), pumpkin pie spice, cloves (which I love and was not included in my specific brand of pumpkin pie spice) and some flour to ensure that my apple crumble got all gooey in the middle.  Take it from me, the flour is the one step here that you do not want to forget.  I forgot last time and it was all runny and good for nothing except drizzling over vanilla ice cream... which now that I think about it, wasn't all that bad to eat.  However, this time I wanted apple crumble, not gooey apple drizzle (if you happen to want the gooey apple drizzle, leave out the flour in the recipe below.  Like I said, awfully good over vanilla bean ice cream).  I stirred a bit and then threw in a couple handfuls of dried cranberries that I had hiding in a cabinet.  Stir again and dump into a gorgeous Temptations baking dish from QVC - check it out:

Love it.  Seriously, they're my baking dishes of choice - I reach for them every time I'm sticking something in the oven and honestly, I haven't found anything that sticks to them yet.  QVC.com.  Go.  It's worth it, I promise.

Time for crumbly goodness to go on top.  I threw half a stick of butter in a bowl with some more brown sugar, pumpkin pie spice, and flour, but I needed something with some texture so I immediately rummaged in the pantry for the container of rolled oats and threw half a cup of those in there too.  I started to mix it all together with a fork, decided it was taking far too long and just mushed it all together with my hands and then crumbled it as evenly as my patience would allow over the top of the apples.

Once in the oven, my crumbly goodness looked like this:

Super cute.  425 degrees for 15 minutes or until the topping is golden brown and the apples are bubbling happily.

It was SO GOOD.  My mom and I were beyond happy with my lack of a recipe and about half an hour later, this is what was left:


Deciding to cook this way might have been the best idea I ever had.


No Frills Apple Crumble

For the filling:

4 Golden Delicious apples, peeled and diced
Juice of 1 lemon
1/2 cup brown sugar (light or dark)
1/2 teaspoon pumpkin pie spice
1/4 teaspoon cloves
Pinch of salt
3 tablespoons flour
1 cup of dried cranberries

For the topping:

1 cup rolled oats
1/2 stick of butter
1/2 teaspoon pumpkin pie spice
1/4 cup brown sugar
2 tablespoons flour

Place the diced apples in a bowl and coat with the lemon juice.  Add the rest of the ingredients for the filling and stir until the flour is completely mixed in.  Pour into a buttered baking dish.  Mix all of the topping ingredients together in a bowl with a fork or your fingers and crumble evenly over the top of the filling.  Bake at 425 degrees for 15 minutes or until the topping is golden and the filling is bubbling at the edges. 

Enjoy!

Monday, March 28, 2011

Gardening Insanity!

Okay fellow food lovers... I am going to do something I have yet to do on this blog.  I am going to talk about my babies.  No, I don't have children.  No, I'm not talking about the two ridiculously adorable (but very loud and crazy) brown beagles sitting on the couch next to me. 

 I mean, come on.  They're too cute.

But yes, dear friends - I am talking about my seedlings!  It is about that time of year when I break out my green thumb and start playing in the dirt for as many hours as a day as I can - FULLY neglecting everything else in my life (right now, the main neglect is homework).  So far, I have started a couple varieties of tomatoes, a couple varieties of peppers, and some eggplant.  Here's the full list:

Tomatoes

Brandywine Red
Brandywine Pink
Mortgage Lifter
Supersteak
Big Rainbow
Black Krim
Sun Gold
Super Sweet 100
Steak Sandwich
Better Boy
Yellow Pear

(okay, so when I said "a couple," I may have been holding back just a little).

Peppers

Pepperoncini (for my dad, whose love of pepperoncini knows no bounds)
Red Roaster Hybrid
Big Dipper (sweet green bells)


Eggplant

Burpee Hybrid


Okay, I should explain something.  I had TERRIBLE luck with eggplants last year.  Plenty of beautiful purple flowers but not a single eggplant to speak of.  Unacceptable, if you ask me.  I'm trying EXTRA hard this year because homemade eggplant parmesan might be the most delicious thing in the history of deliciosity (somebody tell Webster that's a word now!  What?  If BFF can be in Websters, so can deliciosity).  Okay, so once in a while (or maybe a little more than once in a while - I'm sorry, I can't help it!), I will update you all on the progress of my little seedling babies and show you lots of pictures of delicious veggies (knock on wood!).

Here's the first batch:


my little eggplant babies on the left and peppers on the right


all of my eggplant and pepper babies (with some thyme all the way on the far end)


all my baby tomatoes! don't mind the spilled dirt.


all my tomatoes repotted on 3/25 YAY!


And just so we're clear - this is no frills food at its best.  Being able to walk into my garden, pull some veggies off the plants, and bite into them right there is the ultimate no frills snack.  Here's to hoping I don't accidentally eat any dirt while I'm at it.

Happy gardening and eating!

Wednesday, March 23, 2011

Triple Cheese Spirals... (aka "I can't eat anybody else's mac & cheese anymore!")

Hi long lost friends!  Apologies for my ridiculously prolonged absence - I have been trying to use a teaspoon to dig myself out from under the mountain of graduate school homework that is currently crushing me.  Okay so back to the food!

So during my time away, I've been basically doing two things - homework and cooking.  I've made quite a few successful dishes that I have on the proverbial back burner for future blog entries, but I honestly think my most delicious escapade is Triple Cheese Spirals.  I can't take credit for the recipe because I got it from Food Network Magazine (which just might be the greatest publication ever) but I can take credit for my little twist on the recipe!

The first time I made this recipe, my boyfriend and I had just started dating and I was looking for comfort food that was easy to make that I could really impress him with.  Enter Food Network Magazine!  (Sidenote: I bought my subscription for Food Network Magazine from Amazon.com and I only paid $25 for TWO YEARS. SO worth it).  So the cover of Food Network's April 2010 issue looks like this:


And I was immediately GLUED to the part where it said "mac & cheese five ways."  If there is one thing that would impress my darling boyfriend, it is a huge bowl of homemade macaroni and cheese.  So I open the magazine, find the page, and THIS is what I see:

OMG. Hello deliciousness, my taste buds are waiting for you.  So off to the store I went to pick up the few ingredients that I didn't have in my house already (cayenne pepper, ground mustard, and evaporated milk - very inexpensive ingredients that pack a serious flavor punch).  The first few times I made this dish, I stuck to the recipe like glue and my boyfriend was blown away.  For a while there, I was making macaroni and cheese for him every weekend AND making a tray of it for him to bring to work and share with his buddies.  He loved it, his coworkers loved it, and I was so proud of myself for creating something he enjoyed so much.

But as I've said in previous entries, there are days that I wake up starving and craving a specific food.  One day about a month ago, that food was this macaroni and cheese.  However, I wanted some vegetable goodness as well, so I decided to add broccoli and cauliflower to the recipe that time around.  It wound up being INCREDIBLY good (though my boyfriend is still partial to the normal version).  Recipe remix time anyone?  Here's what mine looked like:


Okay, so sue me.  I'm a no frills kind of girl - I'm not a food stylist (though sometimes I truly wish I was).  My picture is nowhere near as gorgeous as Food Network's recipe photo.  I can promise it was just as tasty (if not more so!).  Here's the original recipe, courtesy of the fabulous chefs at Food Network:


 Triple Cheese Spirals

Ingredients


  • Kosher salt
  • 12 ounces gemelli, cavatappi or other spiral-shaped pasta (I use Barilla's cellentani)
  • 3 tablespoons unsalted butter
  • 1 tablespoon all-purpose flour
  • 1 teaspoon dry mustard
  • Pinch of cayenne pepper
  • 1 (12-ounce) can evaporated milk
  • 1/2 cup whole milk
  • 3/4 cup shredded yellow sharp cheddar cheese
  • 3/4 cup shredded monterey jack cheese
  • 1/2 cup grated parmesan cheese
  • 1/2 cup panko (Japanese breadcrumbs)
  • 2 tablespoons chopped fresh parsley, chives and/or scallions
  • For my recipe remix, I added one bag of frozen broccoli and cauliflower that I steamed in the microwave.

Directions

Bring a pot of salted water to a boil; add the pasta and cook until al dente, about 8 minutes.
Meanwhile, melt 1 tablespoon butter in a saucepan over medium heat. Add the flour, mustard and cayenne and stir with a wooden spoon to make a paste. Cook, stirring, until the paste puffs slightly, about 1 minute. Whisk in both milks and 1/2 teaspoon salt and simmer, whisking occasionally, until slightly thickened and creamy, 6 to 7 minutes. Add the cheddar and jack cheeses and all but 2 tablespoons of the parmesan and whisk until melted; keep warm.
Combine the panko, herbs and/or scallions, 1 tablespoon butter and the remaining parmesan in a microwave-safe bowl and microwave until the butter melts, about 1 minute; toss.
Drain the pasta, reserving about 1 cup cooking water, and return to the pot. Toss with the remaining 1 tablespoon butter, then stir in the cheese sauce, adding the reserved cooking water if needed. Season with salt and top with the breadcrumb mixture. 

Recipe Courtesy of Food Network Magazine, April 2010.


And can I tell you the best part?  Recently, my boyfriend and I went out and he tried to eat macaroni and cheese that someone else made.  He stopped after two bites, looked at me, and I swear the first three words out of his mouth were, "I hate you."  I was shocked!  What could I have possibly done to deserve that?  He started laughing and said, "I love you.  But I can't eat anyone else's mac and cheese anymore because yours is so good."  That just melted my heart and was the perfect compliment.  I love you too, babe. :)

If you guys make this, original or remix, you have to let me know how it turns out!

More food sans frills very soon.
Enjoy!

Monday, February 7, 2011

Impromptu Kettle Corn

Well dear friends, it was inevitable.  I am sick.  I (not so) secretly blame my boyfriend, since he was coughing and sniffling far earlier than I was (darn him for being so cute that I can't resist his kisses, even when they're germ infested).  So to get to the point of my story, when I'm feeling under the weather I live by the motto, "Feed a cold, starve a fever."  Don't ask me where I heard it, but it works like a charm every time.  So since my temperature is completely normal, I hereby commence stuffing my face.

After devouring leftovers from Super Bowl Sunday (including dinner and dessert), I decided I wanted popcorn.  But not just regular popcorn.  Kettle corn.  More specifically, the kind that comes in the red bag with the white letters!  But of course, no such luck having any in the house.  So Typhoid Sara officially has to improvise.

Enter one bag of microwave popcorn.  I stuck that in the microwave for 2 minutes and poured 3/4 cup of water and 3/4 cup of sugar in a little pot and turned the heat up.  I let it boil gently for about 8 minutes (or long enough for me to eat a bowl of soup), until it coated the back of a spoon.  I turned off the heat, poured it carefully (very hot sugar = bye bye skin) over the popcorn in a large bowl and shook it up to coat everything.  Voila!  Instant kettle corn, minus the fuss and the money (and everything I used was already in my house).  This is my kind of snack!  I would post a picture, but really it just looks like shiny popcorn - not very interesting to look at.  I think next time I make this I will sprinkle the top with cinnamon.

In other words, no frills AND the sick girl got a yummy snack with very little effort.  I love when the simplest recipes come together.

Now if only the puppies would stop trying to stick their noses in the bowl. :)

Thursday, February 3, 2011

Poor (Wo)man's Potato Salad, Take 2... Let's try this again!

After the bowl of potato salad was empty yesterday, I got a question from my father.

"Why did you only make a little?"

So I proceeded to explain that I wasn't sure how it would taste and didn't know if anyone else would want any.  His response?

"Please make more."

How do you say no to that? :)  So I made more and took the opportunity to take a picture to share since all I got a picture of yesterday was the empty bowl. 

Enjoy!

Wednesday, February 2, 2011

Poor (Wo)man's Potato Salad

Some days, I wake up wildly craving something specific... today, it was potato salad.  Ever since I was little, my Aunt Kathy has made the BEST potato salad and would bring a vat of it to every family cookout and barbecue we ever had.  That potato salad tastes like summer to me; I can almost feel the sun on my shoulders when I'm eating it.  After a month and a half of almost non-stop snow in New York, I needed some summer - I NEEDED potato salad.  Of course, the ideal would be to have Aunt Kathy's potato salad miraculously apparate (yes, that's a Harry Potter term) into my fridge, but in the midst of an ice storm there was no chance of that happening.  I was officially on my own.

Now, I consider potato salad pretty low maintenance fare in the first place but after a birthday weekend vacation and two weird allergic reactions, even a low maintenance task like boiling potatoes was too much for me to handle this afternoon.  After exploring the contents of my refrigerator, I found my saving grace - left over roasted potatoes.  I proceeded to chop them up and throw them in a bowl... but they were cold and I think I speak for most of us when I say nine times out of ten cold potatoes are too dry to be delicious. I had to heat them up.  But how?  Oven - too time consuming.  Microwave would dry the potatoes out even more.  Stove it is.

Three slices of bacon later, I threw the potatoes in the pan with some onion powder and the bacon fat to warm them through.  While that was happening and the bacon was draining on paper towels, I chopped up some celery and a hard boiled egg and combined that with some mayo and some honey mustard (which was laying in my fridge calling to me to use it).  Potatoes went in next, got stirred up, and the crispy bacon was quickly crumbled over the top. 

Best. Potato Salad. Ever.  (Sorry Aunt Kat.  I still love you.)  Even my brother liked it and he is notoriously difficult to impress with food.  The best part?  I didn't have to venture out into the ice storm to spend money on a single, solitary ingredient AND I used up leftovers.  This recipe was ridiculously successful.  You can find all the approximate measurements and everything below.


I went back to take a picture after eating my bowl of potato salad (because it was extraordinarily good looking potato salad) and this is what I found:


I suppose that's the best critique of all.

[Just a note about my recipe writing - unless I'm baking, I am not very particular about measurements.  I think when cooking becomes about perfect measuring, the fun part just gets lost.  Nobody wants to stand there with a measuring cup and 8 measuring spoons when trying to make a quick meal, so I don't write my recipes that way.  When I'm following other people's recipes, I change them according to my own taste buds.  If I like a specific ingredient, I'll probably add more of it than the recipe calls for.  If I don't like something, I'll switch it out for something else.  If I absolutely hate an ingredient, I leave it out altogether.  Feel free to do the same with my recipes - after all, you're only going to use them if they taste good to you.]


Poor (Wo)man's Potato Salad Recipe

3 slices of bacon, cooked until crispy
4-6 cups leftover roasted potatoes, chopped (I should have used more, this was gone in a flash)
1 tsp onion powder
1/2 to 3/4 cup mayonnaise (depending on how much you like)
1/4 cup honey mustard
4 stalks of celery, sliced
1 hard boiled egg, chopped
Salt & pepper


Cook the bacon in a pan until crispy, then remove and drain on paper towels.  Add the chopped potatoes to the pan, add 1 teaspoon onion powder, and warm through.  Slice the celery and chop the hard boiled egg and place them both in a large bowl.  Add the warm potatoes, mayonnaise, and mustard, and stir.  Crumble in crispy bacon and stir to combine.  Serve immediately and pray that your family doesn't eat it all while you're not looking like mine did.


And a huge thanks to my boyfriend for the title of this post - he's so clever. :) 

No Frills, Just Food.

We're all friends here, so let's dispense with the boring, drawn out introductions - my name is Sara, I'm a 25 year old graduate student, and I taught myself how to cook (with a little help from my family and the Food Network).  I currently live at home but my boyfriend and I are hoping to change that soon.  (Helloooo full-time teaching job, where are you?!)  In the meantime, I'm trying to substitute teach, finish my Master's degree, and build up a repertoire of meals so that when it comes time for me to have to cook dinner every single night by myself, I won't be feeding my boyfriend mac and cheese out of a box (I'm pretty sure that's not how you get a big, shiny engagement ring... but don't quote me).

This brings us to my issue.  I am a no frills kind of cook.  I can't be bothered with things that have 73 ingredients (72 of which I don't currently have in my house), 18 pages ("FRONT AND BACK!" for you Friends aficionados) of directions, and 12 hours of active cook time.  No.  I'm sorry, no normal person ever cooks that way and I'm far too impatient to try it out myself.

So here is my quest: find (or create) simple recipes with a normal amount of ingredients (hopefully most of which will already be in my pantry) that will use up my leftovers whenever possible and won't make my bank account scream.  I'll use this blog to share what I come up with (whether that ends in delicious dinners or kitchen catastrophes) and I'm sure you'll hear from my boyfriend now and again, interjecting his opinions on my efforts.  He's hilarious (and brutally honest), you'll like him, I guarantee it. :)

In other, more concise words - no frills, just food.  (And good food, at that.)